Nginx正向代理是和SOCKS5一样的类型的工具,Nginx的正向代理又称HTTP代理,工作在第七层
可以通过Nginx的正向代理去访问某些不能被访问的网站。
配置Nginx正向代理
Nginx自带的正向代理模块不支持HTTPS正向代理,仅支持HTTP正向代理,所以这里需要编译第三方的正向代理模块。
  yum -y install patch
  #下载第三方插件模块
  cd /nginx-moduls
  wget https://github.com/chobits/ngx_http_proxy_connect_module/archive/master.zip
  yum -y install unzip && unzip master.zip
  mv ngx_http_proxy_connect_module-master nginx-http-proxy
  cd /

  #下面的操作全部回车,默认就行
  #查看做实验虚拟机的参数配置文件
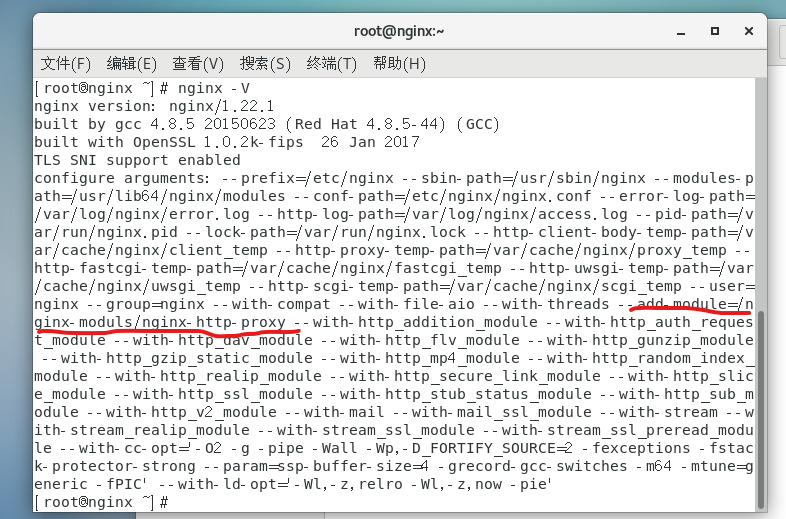
  nginx -V
  #复制看到的参数配置文件,如下(如果是用yum安装的和下面肯定一致)
  ./configure --prefix=/etc/nginx --sbin-path=/usr/sbin/nginx --modules-path=/usr/lib64/nginx/modules --conf-path=/etc/nginx/nginx.conf --error-log-path=/var/log/nginx/error.log --http-log-path=/var/log/nginx/access.log --pid-path=/var/run/nginx.pid --lock-path=/var/run/nginx.lock --http-client-body-temp-path=/var/cache/nginx/client_temp --http-proxy-temp-path=/var/cache/nginx/proxy_temp --http-fastcgi-temp-path=/var/cache/nginx/fastcgi_temp --http-uwsgi-temp-path=/var/cache/nginx/uwsgi_temp --http-scgi-temp-path=/var/cache/nginx/scgi_temp --user=nginx --group=nginx --with-compat --with-file-aio --with-threads --with-http_addition_module --with-http_auth_request_module --with-http_dav_module --with-http_flv_module --with-http_gunzip_module --with-http_gzip_static_module --with-http_mp4_module --with-http_random_index_module --with-http_realip_module --with-http_secure_link_module --with-http_slice_module --with-http_ssl_module --with-http_stub_status_module --with-http_sub_module --with-http_v2_module --with-mail --with-mail_ssl_module --with-stream --with-stream_realip_module --with-stream_ssl_module --with-stream_ssl_preread_module --with-cc-opt='-O2 -g -pipe -Wall -Wp,-D_FORTIFY_SOURCE=2 -fexceptions -fstack-protector-strong --param=ssp-buffer-size=4 -grecord-gcc-switches -m64 -mtune=generic -fPIC' --with-ld-opt='-Wl,-z,relro -Wl,-z,now -pie'
  #安装编译环境
  yum -y install gcc gcc-c++ pcre pcre-devel openssl openssl-devel zlib zlib-devel gd gd-devel
#创建用户,如果直接使用做实验的机器则不需要此操作
  useradd -s /sbin/nologin nginx
#安装依赖库1 必装
  sudo yum install -y libxml2-devel.x86_64
#安装依赖库2 必装
  sudo yum install -y libxslt-devel.x86_64
#下载Nginx源码包
  wget https://nginx.org/download/nginx-1.22.1.tar.gz
  tar -xvf nginx-1.22.1.tar.gz
  #进入解压好的源码包
  cd nginx-1.22.1/
  #配置插件包,使用Nginx 1.22.1以及1.23以上的需要用102101文件,不然会报错
  patch -p1 < /nginx-moduls/nginx-http-proxy/patch/proxy_connect_rewrite_102101.patch
#下面编写Nginx的配置文件内容,准备编译(下面是已经准备好的配置文件)
  ./configure --prefix=/etc/nginx --sbin-path=/usr/sbin/nginx --modules-path=/usr/lib64/nginx/modules --conf-path=/etc/nginx/nginx.conf --error-log-path=/var/log/nginx/error.log --http-log-path=/var/log/nginx/access.log --pid-path=/var/run/nginx.pid --lock-path=/var/run/nginx.lock --http-client-body-temp-path=/var/cache/nginx/client_temp --http-proxy-temp-path=/var/cache/nginx/proxy_temp --http-fastcgi-temp-path=/var/cache/nginx/fastcgi_temp --http-uwsgi-temp-path=/var/cache/nginx/uwsgi_temp --http-scgi-temp-path=/var/cache/nginx/scgi_temp --user=nginx --group=nginx --with-compat --with-file-aio --with-threads --add-module=/nginx-moduls/nginx-http-proxy --with-http_addition_module --with-http_auth_request_module --with-http_dav_module --with-http_flv_module --with-http_gunzip_module --with-http_gzip_static_module --with-http_mp4_module --with-http_random_index_module --with-http_realip_module --with-http_secure_link_module --with-http_slice_module --with-http_ssl_module --with-http_stub_status_module --with-http_sub_module --with-http_v2_module --with-mail --with-mail_ssl_module --with-stream --with-stream_realip_module --with-stream_ssl_module --with-stream_ssl_preread_module --with-cc-opt='-O2 -g -pipe -Wall -Wp,-D_FORTIFY_SOURCE=2 -fexceptions -fstack-protector-strong --param=ssp-buffer-size=4 -grecord-gcc-switches -m64 -mtune=generic -fPIC' --with-ld-opt='-Wl,-z,relro -Wl,-z,now -pie'

#---------------------------------------------------------
#返回下面的参数就代表可以准备编译了
Configuration summary
  + using threads
  + using system PCRE library
  + using system OpenSSL library
  + using system zlib library

  nginx path prefix: "/etc/nginx"
  nginx binary file: "/usr/sbin/nginx"
  nginx modules path: "/usr/lib64/nginx/modules"
  nginx configuration prefix: "/etc/nginx"
  nginx configuration file: "/etc/nginx/nginx.conf"
  nginx pid file: "/var/run/nginx.pid"
  nginx error log file: "/var/log/nginx/error.log"
  nginx http access log file: "/var/log/nginx/access.log"
  nginx http client request body temporary files: "/var/cache/nginx/client_temp"
  nginx http proxy temporary files: "/var/cache/nginx/proxy_temp"
  nginx http fastcgi temporary files: "/var/cache/nginx/fastcgi_temp"
  nginx http uwsgi temporary files: "/var/cache/nginx/uwsgi_temp"
  nginx http scgi temporary files: "/var/cache/nginx/scgi_temp"

#--------------分割-----------------
  #这里只要编译,不需要编译安装,所以不要make install,会出错的
  #八个线程编译源码包
  make -j8
  #如果出现编译失败请删除之前的旧编译环境
  #编译好了之后进入objs文件夹,里面有编译好的Nginx文件,复制到需要配置Nginx的服务器上
  #停掉Nginx服务
  systemctl stop nginx
  #复制Nginx文件到/usr/sbin/下
  #配置可执行权限
  chmod a+x /usr/sbin/nginx
  #配置查看Nginx配置文件有没有新编译的插件在上面
  nginx -v
  #启动Nginx服务器
  systemctl start nginx
查看配置文件有没有刚才编译的插件

查看到Nginx正向代理插件安装成功了,下面配置Nginx配置文件
  server {
        resolver 223.5.5.5 ipv6=off;
        resolver_timeout 5s;
        listen 880;
        proxy_connect;
        proxy_connect_allow     443 80;
        proxy_connect_connect_timeout 20s;
        proxy_connect_read_timeout 20s;
        proxy_connect_send_timeout 20s;

        location / {
                proxy_pass $scheme://$http_host$request_uri;
        }
  }
上面的配置文件配置完了重启Nginx服务器
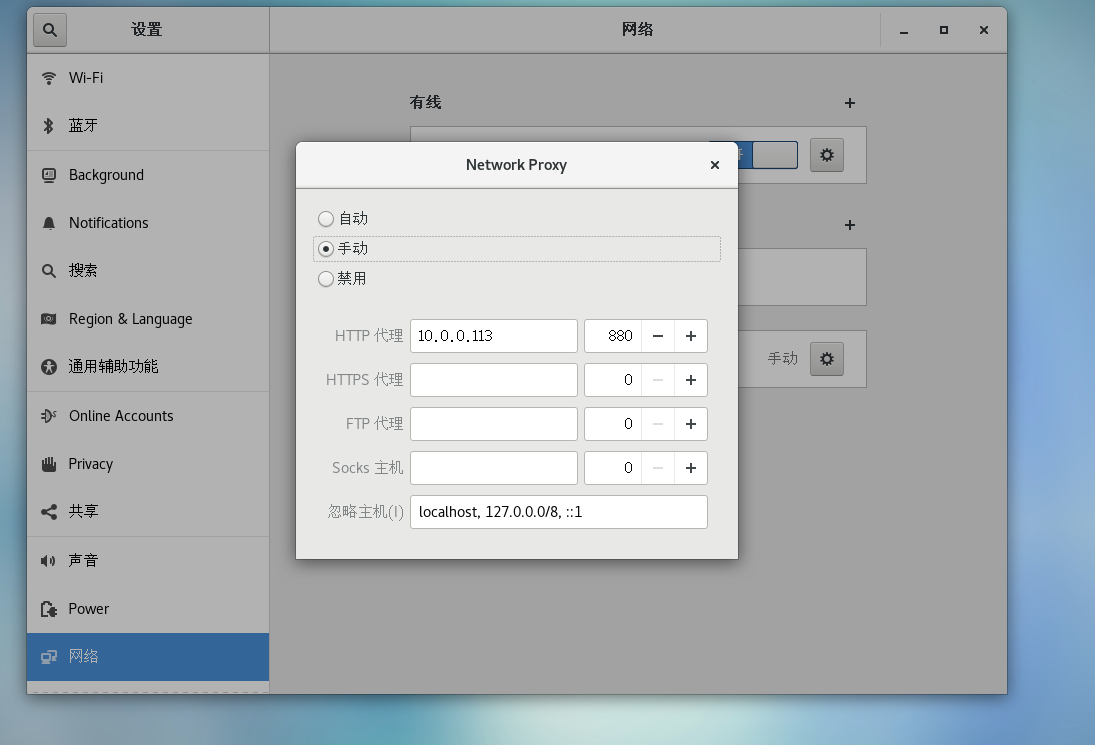
systemctl restart nginx在另外一台Linux上打开网络,HTTP代理,输入以下参数
HTTP代理
IP地址10.0.0.113;端口880;
设置完的结果截图

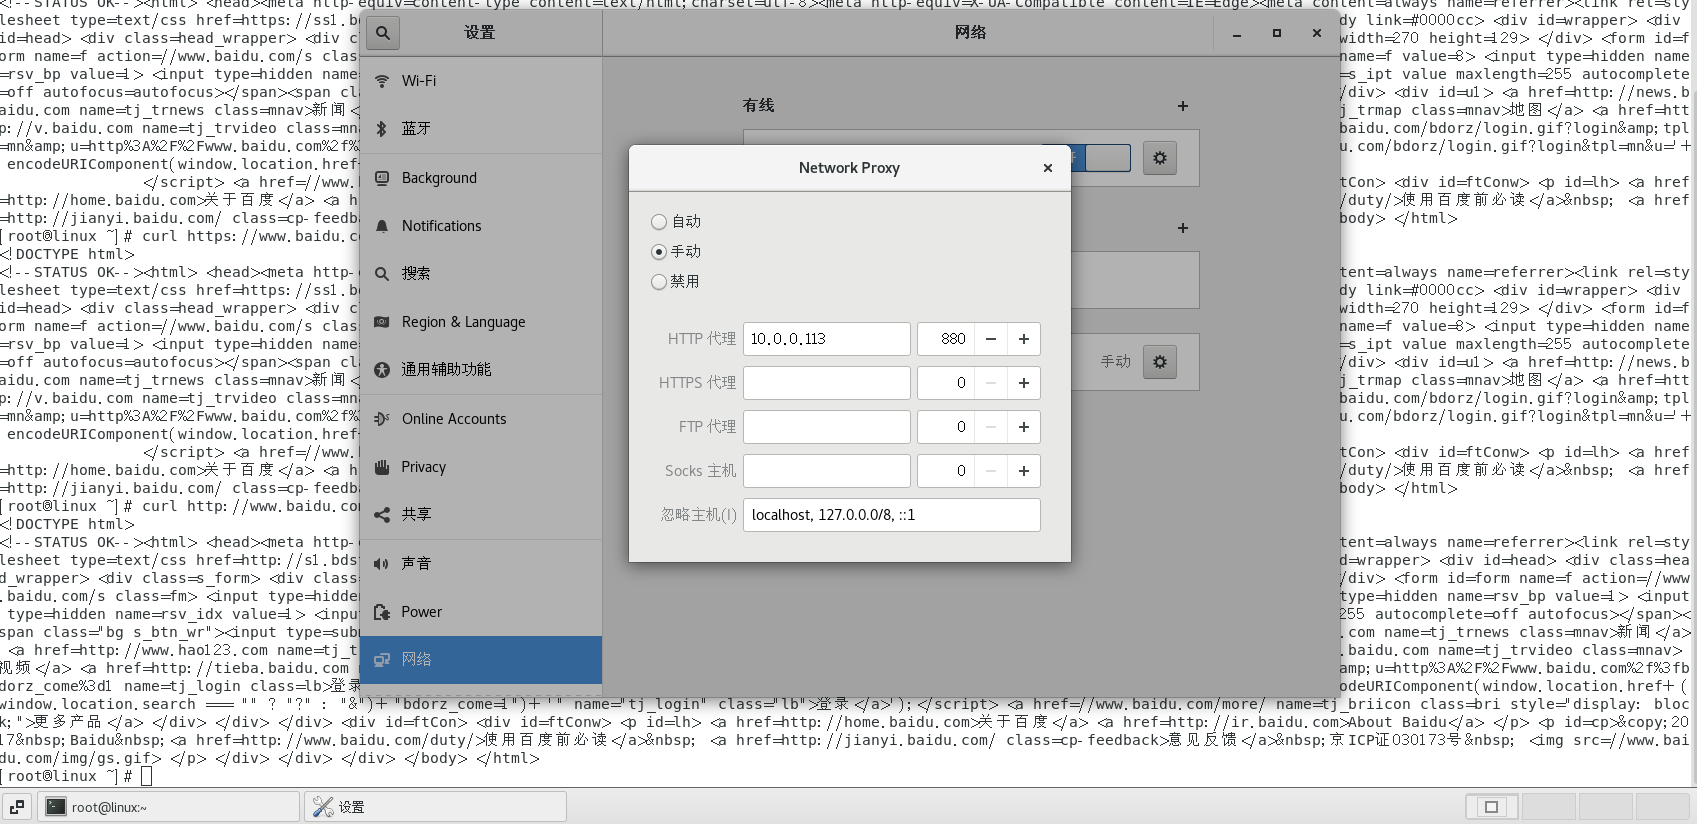
保存,使用curl命令试试能不能curl访问到一baidu
curl http://baidu.com

经过测试,网站已经通过HTTP代理打开


评论